

Besides my beloved Kat Dennings, Hayden Panettiere comes in at a close second for my girl crush of the moment. I think when she cut her hair short - like in this picture - she looked so sophisticated and, dare I say it, trendy! I had never seen her in many movies before and I've never watched Heroes but when I went to see Scream 4, I was blown away by her look. Besides the amazing haircut, her makeup and outfits always looks so good and she defiantly has a bit of the rock chick goin' on. Also, a couple of friends of mine have said that they think I look a bit like her - and that is SUCH a compliment to me! (I don't think I resemble her at all - besides the blonde!)
In this particular image, Hayden has pulled together a makeup look which is very understated yet classy. Keeping most of her makeup towards the natural and nude tones, she has emphasised her eyes with those amazing false lashes, which really makes the green of her eyes stand out.
In my usual Beauty Crush posts, I try and just list what techniques I think were used but to change things up a bit, I'm going to show you all which items from my makeup collection I would use to recreate this look. If I don't own something, I will still add what I would've used and add a link for it from the web. I will add links to the names of each product mentioned (written in bold), which will take you to a past blog post I have on it (if you want to read more about them, that is).
STEP 1
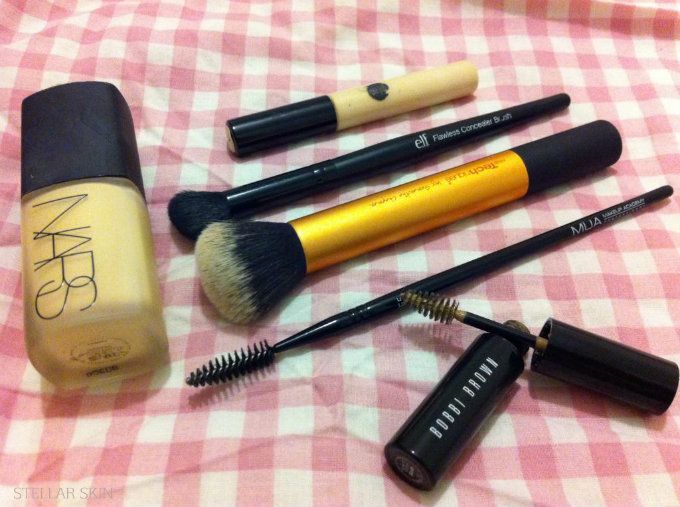
As this is an evening look, I would want to properly prep my face in order for it to be in great condition. For this I would use my trusty Clean&Clear Dual Action Moisturiser all over my face and neck, then let it sink in for a few minutes. I would also use a great primer and for that, I would have used the famous Hourglass - Veil Mineral Primer Spf15. I usually would apply both of these with my fingers but recently I had heard that the brilliant Bobbi Brown herself actually uses a foundation brush to apply skin creams etc. So that is another option.
Now onto the makeup! To start off, I have chosen my Nars Sheer Matte Foundation in Siberia which I would apply all over my face and under the jawline with my favourite foundation brush - Real Techniques Buffing Brush. This will really blend out the colour and buff it into the skin, leaving it with a medium coverage and flawless look. Hayden obviously has a darker skin tone than mine but I will add a bit of warmth later on.
Next is the concealer - I would use the fabulous Collection 2000 Lasting Perfection Concealer in Fair and would apply this in a triangle shape under the eyes, coming down the side of the nose and back up at an angle and also under the brow bone, around the base of the nose and centre of the chin. This is what most of the Hollywood stars are now doing to their makeup as it really lifts the face and brightens. If you have a light reflecting concealer which is good coverage, then use that. I would then blend out the product with my Elf Concealer Brush.
For my brows, I would first give them a quick brush with my MUA Brow Brush to make sure there isn't any foundation trapped there, then I would apply my Bobbi Brown Natural Brow Shaper + Hair Touch Up in Blonde. Hayden has perfectly trimmed and shaped eyebrows and this product will keep mine in place for hours.
STEP 2
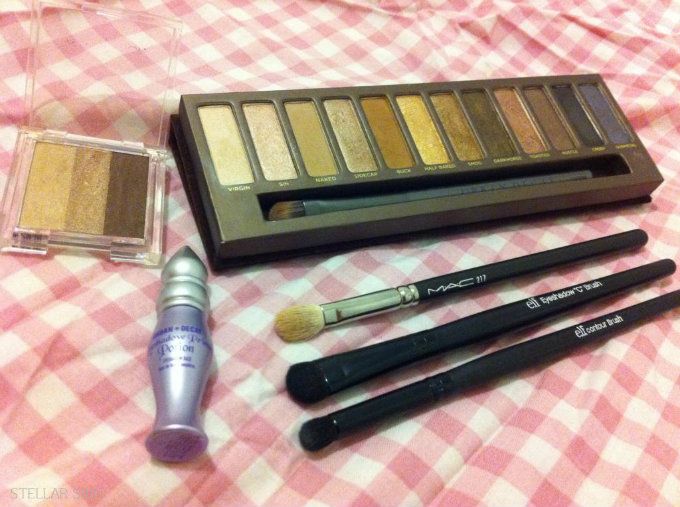
For the eyes, I would start off with my legendary primer - the Urban Decay Eyeshadow Primer Potion - and pat this product in all over the lids. This will prevent any creasing by providing a smooth, dry base for the shadow to be applied on top of. Hayden seems to be wearing a mid-toned orange/brown shade in her eyes and to recreate this, I would begin with my Urban Decay Naked Palette and the shade Virgin. Using my Elf Shadow "C" Brush, I would pat this colour all over the lids and above the crease and then blend in using my Mac 217. Virgin is a beautiful shade, which is very understated but has great light reflecting shimmer which will brighten the eyes.
I would then choose the shade Smog from the Naked Palette to apply through the crease of the eye and my tool for that would be my Elf Eye Contour Brush. I love this brush as it is so versatile for more than just the eye crease (it also works great for adding shimmer to the tear-duct and is especially good at blending concealer over individual blemishes on the face). After applying Smog, I would again take my Mac 217 and gently blend the colour in using a window-wiper motion. The lighter you go with blending, the better the results!
I would then use the flat brush which comes with the Naked Palette to run the Smog shade just under the eye and then blend very lightly with the 217. That brush is perfect as it has such a straight edge.
As I don't have an orange/brown shade, the next best thing for me to use would be the middle shade from my Collection 2000 'Colour Intense Trio' in 3 Cookie Dough. This does look like a standard brown but when you apply it, the shade is much more along the lines of a copper colour and it has some lovely rusty red/terracotta undertones. I would apply this to the outer corner of my lid using the Elf Shadow 'C' Brush again and also, again, would blend out with the 217. You will probably want to spot clean your blending brush in between each stage to avoid smudginess - just swirl your brush around a dry tissue to spot clean. Finally, you can take a bit of this shade with the Naked Palette brush and run under the eye and blend. When I tried these shadow looks together earlier, I found that they all came together really well and did look very much like Hayden's.
STEP 3
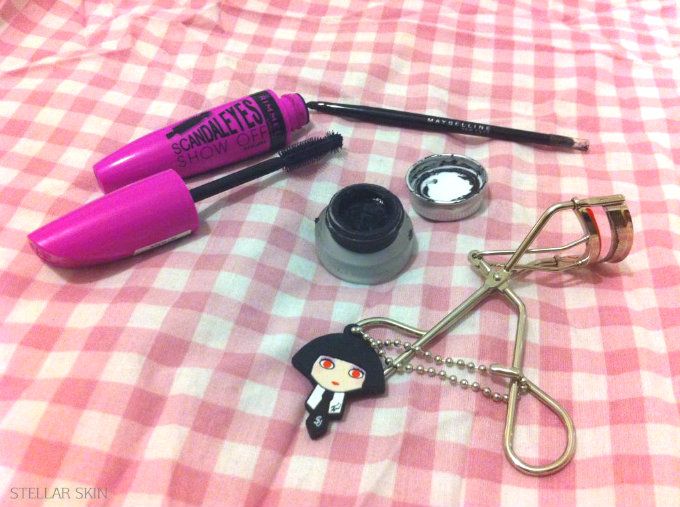
After applying the eyeshadows, I would then start on my eyeliner and for this, I have chosen my Maybelline Eye Studio 'Lasting Drama' Gel Eyeliner in 01 Intense Black. This is the blackest gel liner I've come across and it is great value for money (around £5.99) and it comes with its own eyeliner brush - it has also been recommended by Lisa Eldridge - need I say more? Using the liner brush, I would apply a thin line of this along the top lash line, keeping as close to the roots as possible, and add a very tiny flick at the end. Applying gel liner is much easier than liquid but you may still want to practice a couple of times to perfect your technique. I would also add some on my tight-line and along the waterline. This really frames the eyes and compliments the shadows - as you can see in Hayden's picture.
I would then carefully curl my lashes with the brilliant Shu Uemura Eyelash Curlers. You may want to let the gel liner dry in for a few minutes before this step, as it could smudge. After curling, I would then apply a basic coat of mascara to the top and lower lashes and for this, I have chosen my new Rimmel Scandaleyes Show Off Mascara in 001 Black. I really love the brush of this mascara as you can get right into the roots and really separate them.
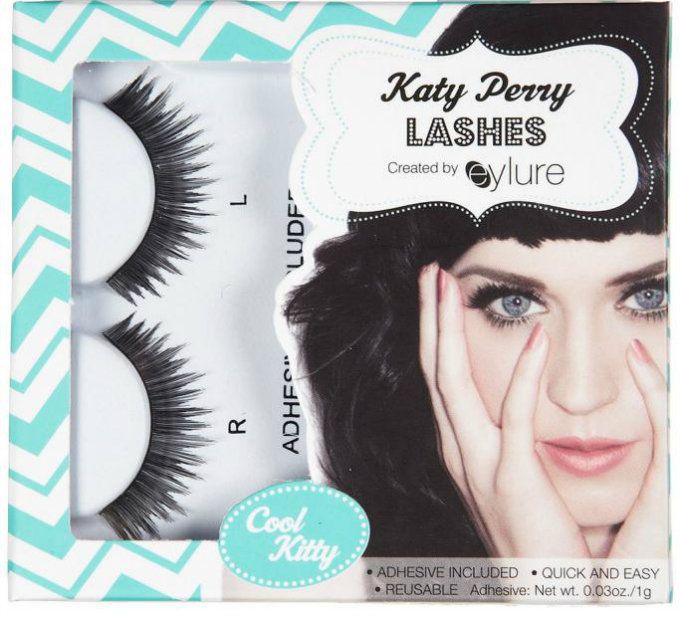
Finally, for the most dramatic part of this tutorial, I have chosen the false lashes I think are the best for this look. The Katy Perry Lashes in Cool Kitty are very big and dramatic but not too over the top. Hayden's false lashes look amazing in her image and are the main focal point of her whole makeup look, so these Katy Perry ones would be perfect to recreate this. Once the lashes are applied, I would then go back in with the gel liner and draw a thin line over the top lash line to cover the stem of the falsies. I would then apply one more coat of mascara to blend my lashes in with the false set.
STEP 4
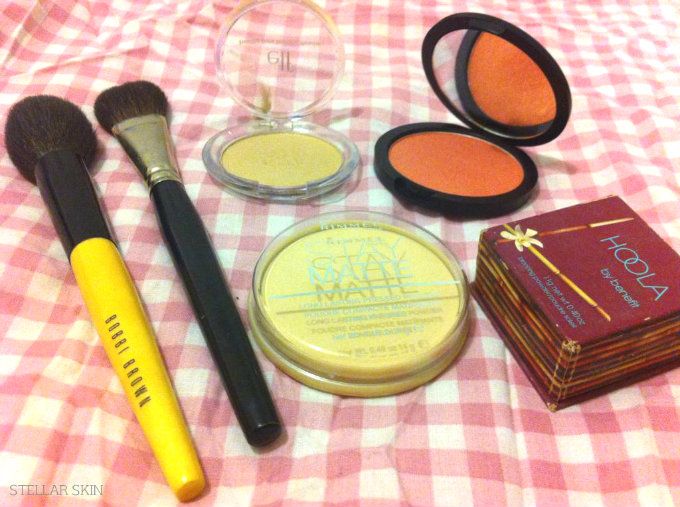
Now the eyes are complete, you can finish off the face. The next step I would choose is to add some warmth to my skin as I am very very pale. Hayden has lovely tanned skin in her look, which makes her look so healthy and for this, I have chosen an old favourite of mine. Benefit Hoola Bronzer is a product I used to wear when I was a teenager and struggling with having such fair skin. Nowadays, I would use this in the summertime to give myself a little glow and for this look, I would lightly apply this in a figure of '3' motion; starting at my temple, I would run the bronzer down and under the cheekbone and then round, down and under the jawline. This will contour my face as well as giving me a subtle glow, and the tool I would use this with would be my beloved Bobbi Brown Powder Brush. Hayden has a very peachy colour on her cheeks and quite a bit of shimmer, so for that I would use my Dainty Doll Powder Blusher in 004 You Are My Sunshine. This is a gorgeous peach/pink colour which has lots of gold shimmer mixed in and that really catches the light well. (Another good choice would be Nars Orgasm) I would apply this colour to the apples of my cheeks using my Laura Mercier Blusher Brush.
Next up would be to add a highlighter as Hayden's look is very much golden and glowing. For this, I would choose my Elf Shimmer Powder and - again using my blusher brush (which I had dry spot cleaned) - would apply this to the tops of my cheekbones and blend out in an upwards motion. I would also add a bit down the centre of my nose, cupids bow, chin and brow bone. There really is no need to go heavy with this stuff as it will look too much - think "less is more".
To finish off the face, I would use my good old Rimmel Stay Matte Pressed Powder in Translucent with my Bobbi Brown Powder Brush (again, dry spot cleaned after using the bronzer) and would apply it very lightly all over the face. You still want to be able to see all your shimmer so really go lightly and only use a few gentle sweeps across the face. This powder is as good as any luxury brands version - it is becoming a cult product for all the professional makeup artists! Using a powder will keep your makeup in place all night and is a must for this look.
STEP 5

The final step! As you can see in the image above, Hayden has kept her lips very nude and subtle. So, for me to recreate this, I will first need to lightly trace around the lines of the mouth in order to get a perfect lip frame. For this I would use my Rimmel Exaggerate Full Colour Lip Liner in East End Snob - which is basically the exact same colour as my lips! (even a lighter shade of this would work well)
Next I would choose the most understated yet most beautiful pink nude lipstick I own, and that's my Esteè Lauder Pure Colour Crystal Lipstick in Crystal Baby.
I have a bit of a confession about this lipstick - I actually found this, brand-new and unopened, under the bed in a hotel I was staying at in Ireland! I did ask the manager if anyone had called about it (I have such a guilty conscious about things) and he told me just to keep it! It costs £19.50, so I was pretty happy about it! Ha!
To finish off this whole look, I have chosen one of my all time favourite nude lip glosses. My Mac Plushglass in Ample Pink is a great nude shade with lovely pink undertones. I find this type of gloss to be very pigmented and feel it lasts for ages on the lips. It is also small enough to put into your clutch bag for touch ups - when out at your fabulous red carpet event, that is!
And that's it! My first tutorial for my 'Beauty Crush' series! I hope you all like this look and find my steps easy enough to follow.
Let me know what you think of this new version of my Beauty Crush post! Also, please comment and let me know of any women you would like me to cover in this series! :)
xoxo
RB
(Image via JustJared)
Love this look. Hayden looks amazing!
ReplyDelete♥ Anusha
Aw, thank you! I love Hayden! I think she looks so lovely
Deletexoxo
Oh my goodness, Hayden is perfect to the luminescent extreme! :) I love that image you picked of her and thank you so much for the absolutely gorgeous tutorial of how to emulate her golden beauty (now, if only I could have her face too...hahaha).
ReplyDeleteI love your blog and am following you now! I would be so delighted if you came and visited me too! <3
<3 Mandy xx
http://frocksandotherfrivolities.blogspot.com
I love NARS Sheer Glow and that Real Techniques Brush!!
ReplyDeleteWonderful, informative, beautiful post lady!
xo
Courtney
Love this look! :) I might recreate it myself, thanks xx
ReplyDeleteHayden looks stunning and your post was very inspiring! Have a great day! :)♥
ReplyDeleteFrom Finland, with ♥,
curiousnoora.blogspot.com
She's so stunning x
ReplyDeletecheck out my cath kidston giveaway 1stepclosereveryday.blogspot.co.uk
Hayden is really, really beautiful! And I definitely enjoyed reading your post! :)
ReplyDeletecallmemaddie.blogspot.com
She is absolutely gorgeous :) I really want to try that nars foundation! Xx
ReplyDelete